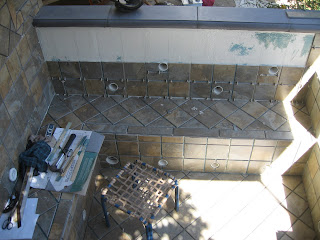


"Just coming on the end of August. Another summer's promise almost gone". These words from The Eagles were my inspiration two years ago when I thought about starting this project all summer, but never did, and regretted it until I did start in April of '09.
So again this year I accomplished something, just not as much as I thought I would! Like everything else with this project, measuring, cutting and placing the tile took a lot more time than I thought it would! For one thing, when all was said and done, I placed 872 pieces of tile!
Cutting the tile around round 21 spa jets and return lines with a straight saw is a challenge, and took some creativity and the most time. The cuts around the jet lines did not have to be too precise because they would be covered with the flange of the spa jet covers. But it needed to be close and it was a little tedious.
The ceramic tile has to be cut with a "Wet" saw, meaning that the blade needs to stay wet in order to minimize chipping the tile. It also prolongs the life of the blade. The saw is a Home Depot special that I bought a few years ago to cut porcelain tile for my patio. Unlike a more expensive model that continually drips water onto the blade, the blade on mine runs through a trough of water that sprays water up onto the tile-and the user! So basically I got soaked whenever I used it, and I wore tiny tile shards on my face, shirt and glasses.
The most challenging aspect of placing this tile was the adhesive I used on the entire inside of the spa. It is part of a high tech product line that features a coordinated system that synchronizes the waterproofing with the tile adhesion. The waterproofing material molecularly bonds with the tile adhesive creating an impressive bond that hopefully will withstand the hydrostatic pressure, heat and water treatment of the spa water. That's the good news.
The bad news is that the adhesive is an expensive, nasty two part product that needs to be precisely measured and mixed in small batches, because it has a short working time before it turns to rubber. All of the reusable tools (and me) needed to be cleaned with Xylene.
One part is a liquid and the other is a thick paste that has to be mixed 1 part paste to 2 parts liquid. There is no saving extra adhesive after it is mixed. The surface has to be cleaned with Xylene, otherwise, you can peel the dried adhesive right off.
So I had to cut and layout small sections of the spa before I made up a batch of adhesive. I didn't have time to cut pieces to fit once the adhesive was mixed, and I couldn't make any mistakes placing the tile, because to remove a piece of tile would also remove the waterproofing and probably part of the concrete block! Each batch was only good for between 8 and 9 square feet, and the spa has over 150 square feet of tile.
Thankfully no one had a camera when I was measuring and placing the tile in the foot well. Just picture me curled up in an area that is 40" X 64" trying to look at a level upside down and making a paper pattern! I think I may even have dosed off down there!
For the longest time I couldn't figure out why I would get so tired by the end of the day measuring and cutting the tile, until I started thinking about how many times I would climb down into the spa, measure tile, climb up out of the spa, cut the tile, climb back into the spa, mark the corrections, and climb back out again-over and over and over. It's like I was rock climbing all day!
Next step-Grouting.